How to Use TradingView Strategies to Automate Trades on Binance with make.com
Transforming your cryptocurrency trading from manual analysis to automated execution can seem like a daunting journey. This guide will walk you through each step of creating a robust, automated trading system using TradingView, Binance, and Make.com—breaking down complex processes into manageable, actionable steps.
Transforming your cryptocurrency trading from manual analysis to automated execution can seem like a daunting journey. This guide will walk you through each step of creating a robust, automated trading system using TradingView, Binance, and Make.com—breaking down complex processes into manageable, actionable steps.
Preparing Your Automation Toolkit
Before we dive into the technical details, let's ensure you have everything you need:
Required Tools and Accounts
- TradingView Account
- Sign up at tradingview.com
- Recommended: Pro or Pro+ plan for advanced strategy development
- Essential for creating and testing trading strategies
- Binance Account
- Register at binance.com
- Complete KYC (Know Your Customer) verification
- Enable two-factor authentication for security
- Make.com Account
- Create an account at make.com
- Choose a plan that supports webhook and API integrations
- Familiarize yourself with the visual workflow interface
Detailed Service Walkthrough
Part 1: Developing Your TradingView Strategy
Strategy development is the heart of automated trading. We'll create a moving average crossover strategy as a practical example.
Step-by-Step Strategy Creation
- Open TradingView Pine Script Editor
- Navigate to Pine Editor (View > Pine Editor)
- Click "New" to create a blank strategy script
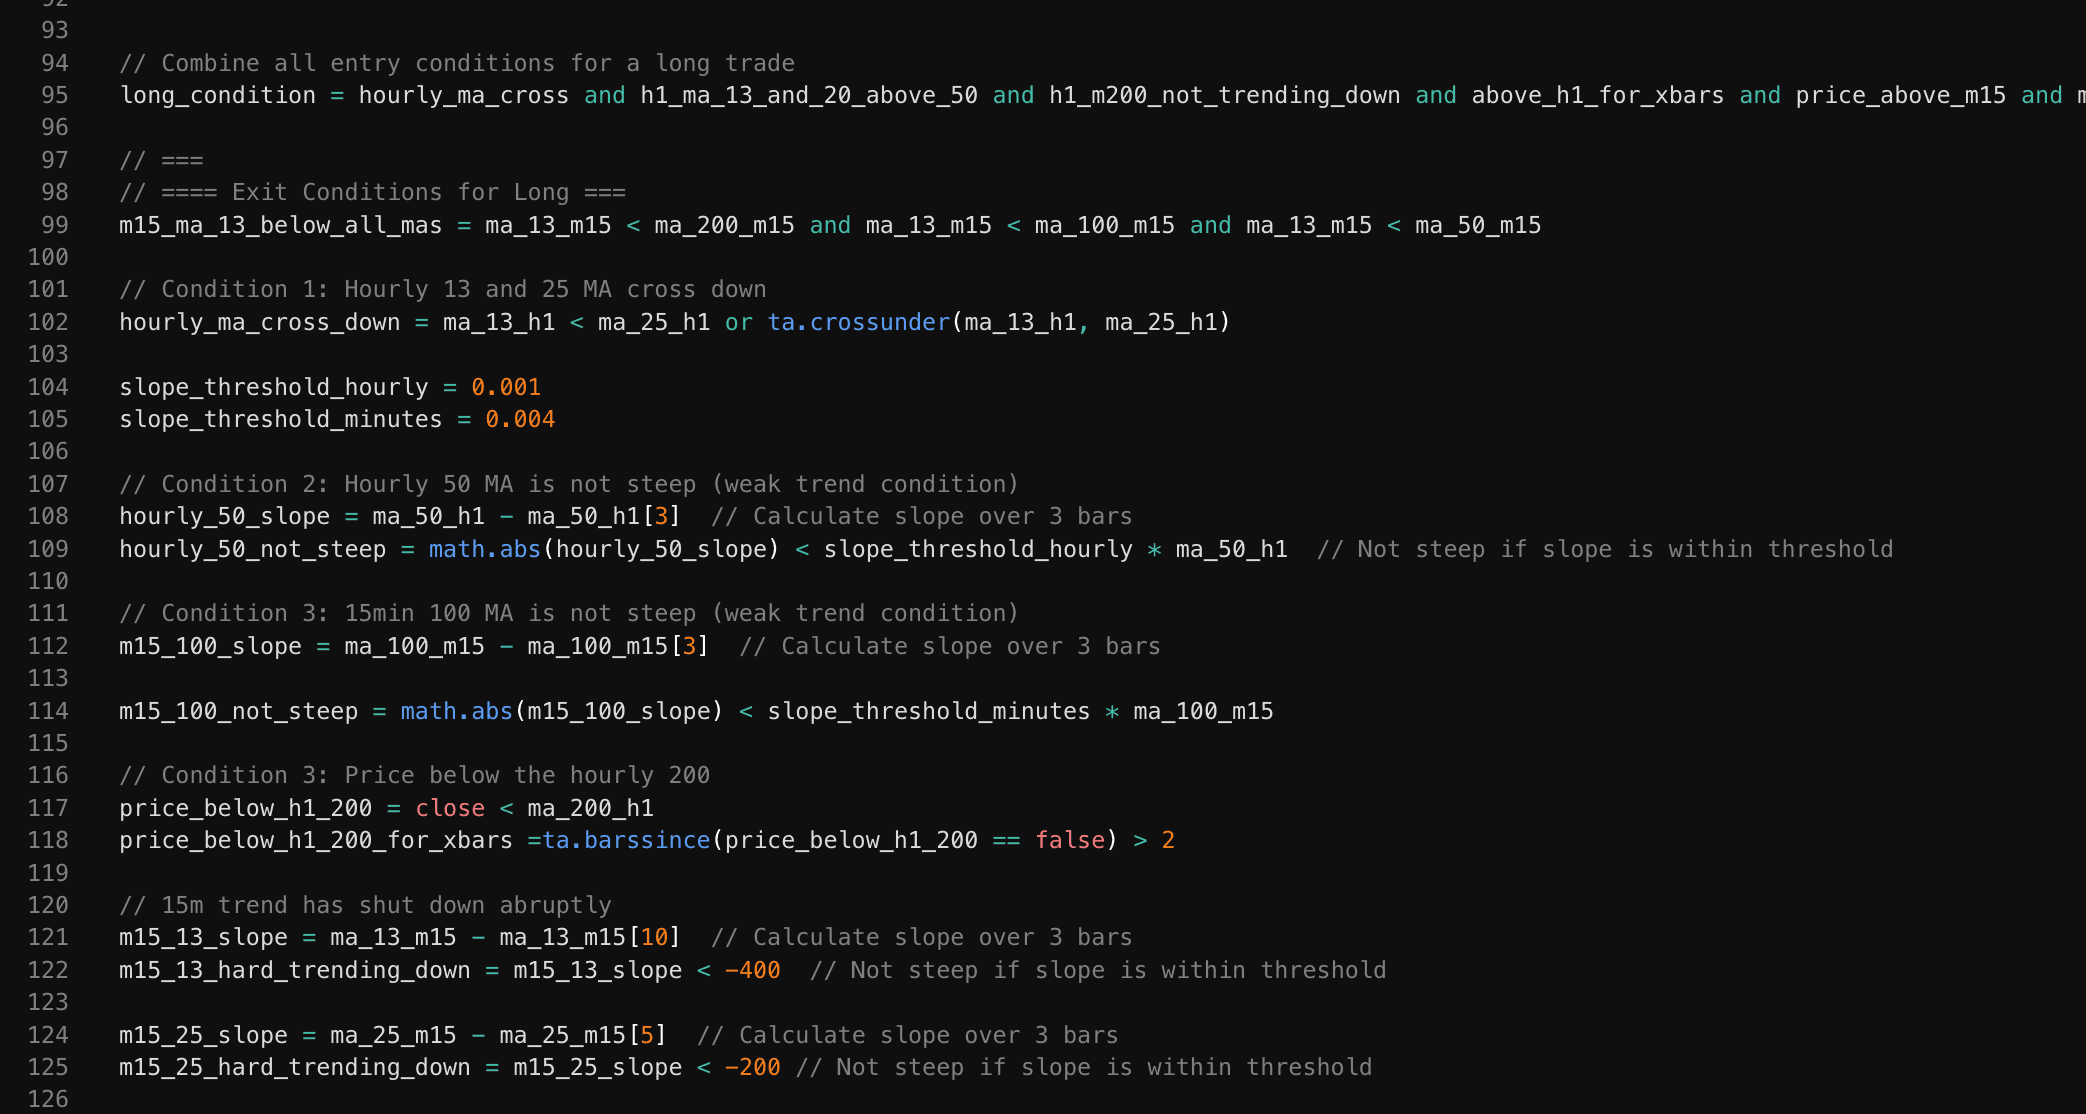
- Write the Strategy Script
// Comprehensive Moving Average Crossover Strategy
//@version=5
strategy("Advanced MA Crossover",
         overlay=true,
         initial_capital=10000,
         default_qty_type=strategy.percent_of_equity,
         default_qty_value=10)  // Risk only 10% per trade

// Input parameters for customization
shortPeriod = input.int(50, minval=1, title="Short MA Period")
longPeriod = input.int(200, minval=1, title="Long MA Period")
rsiPeriod = input.int(14, minval=1, title="RSI Period")
rsiOverboughtLevel = input.int(70, title="RSI Overbought")
rsiOversoldLevel = input.int(30, title="RSI Oversold")

// Calculate indicators
shortMA = ta.sma(close, shortPeriod)
longMA = ta.sma(close, longPeriod)
rsiValue = ta.rsi(close, rsiPeriod)

// Define entry conditions
longCondition = ta.crossover(shortMA, longMA) and rsiValue < rsiOverboughtLevel
shortCondition = ta.crossunder(shortMA, longMA) and rsiValue > rsiOversoldLevel

// Execute trading logic
if (longCondition)
    strategy.entry("Long", strategy.long)
if (shortCondition)
    strategy.close("Long")
Key strategy enhancements:
- Added input parameters for customization
- Incorporated RSI to filter trade signals
- Implemented risk management through position sizing
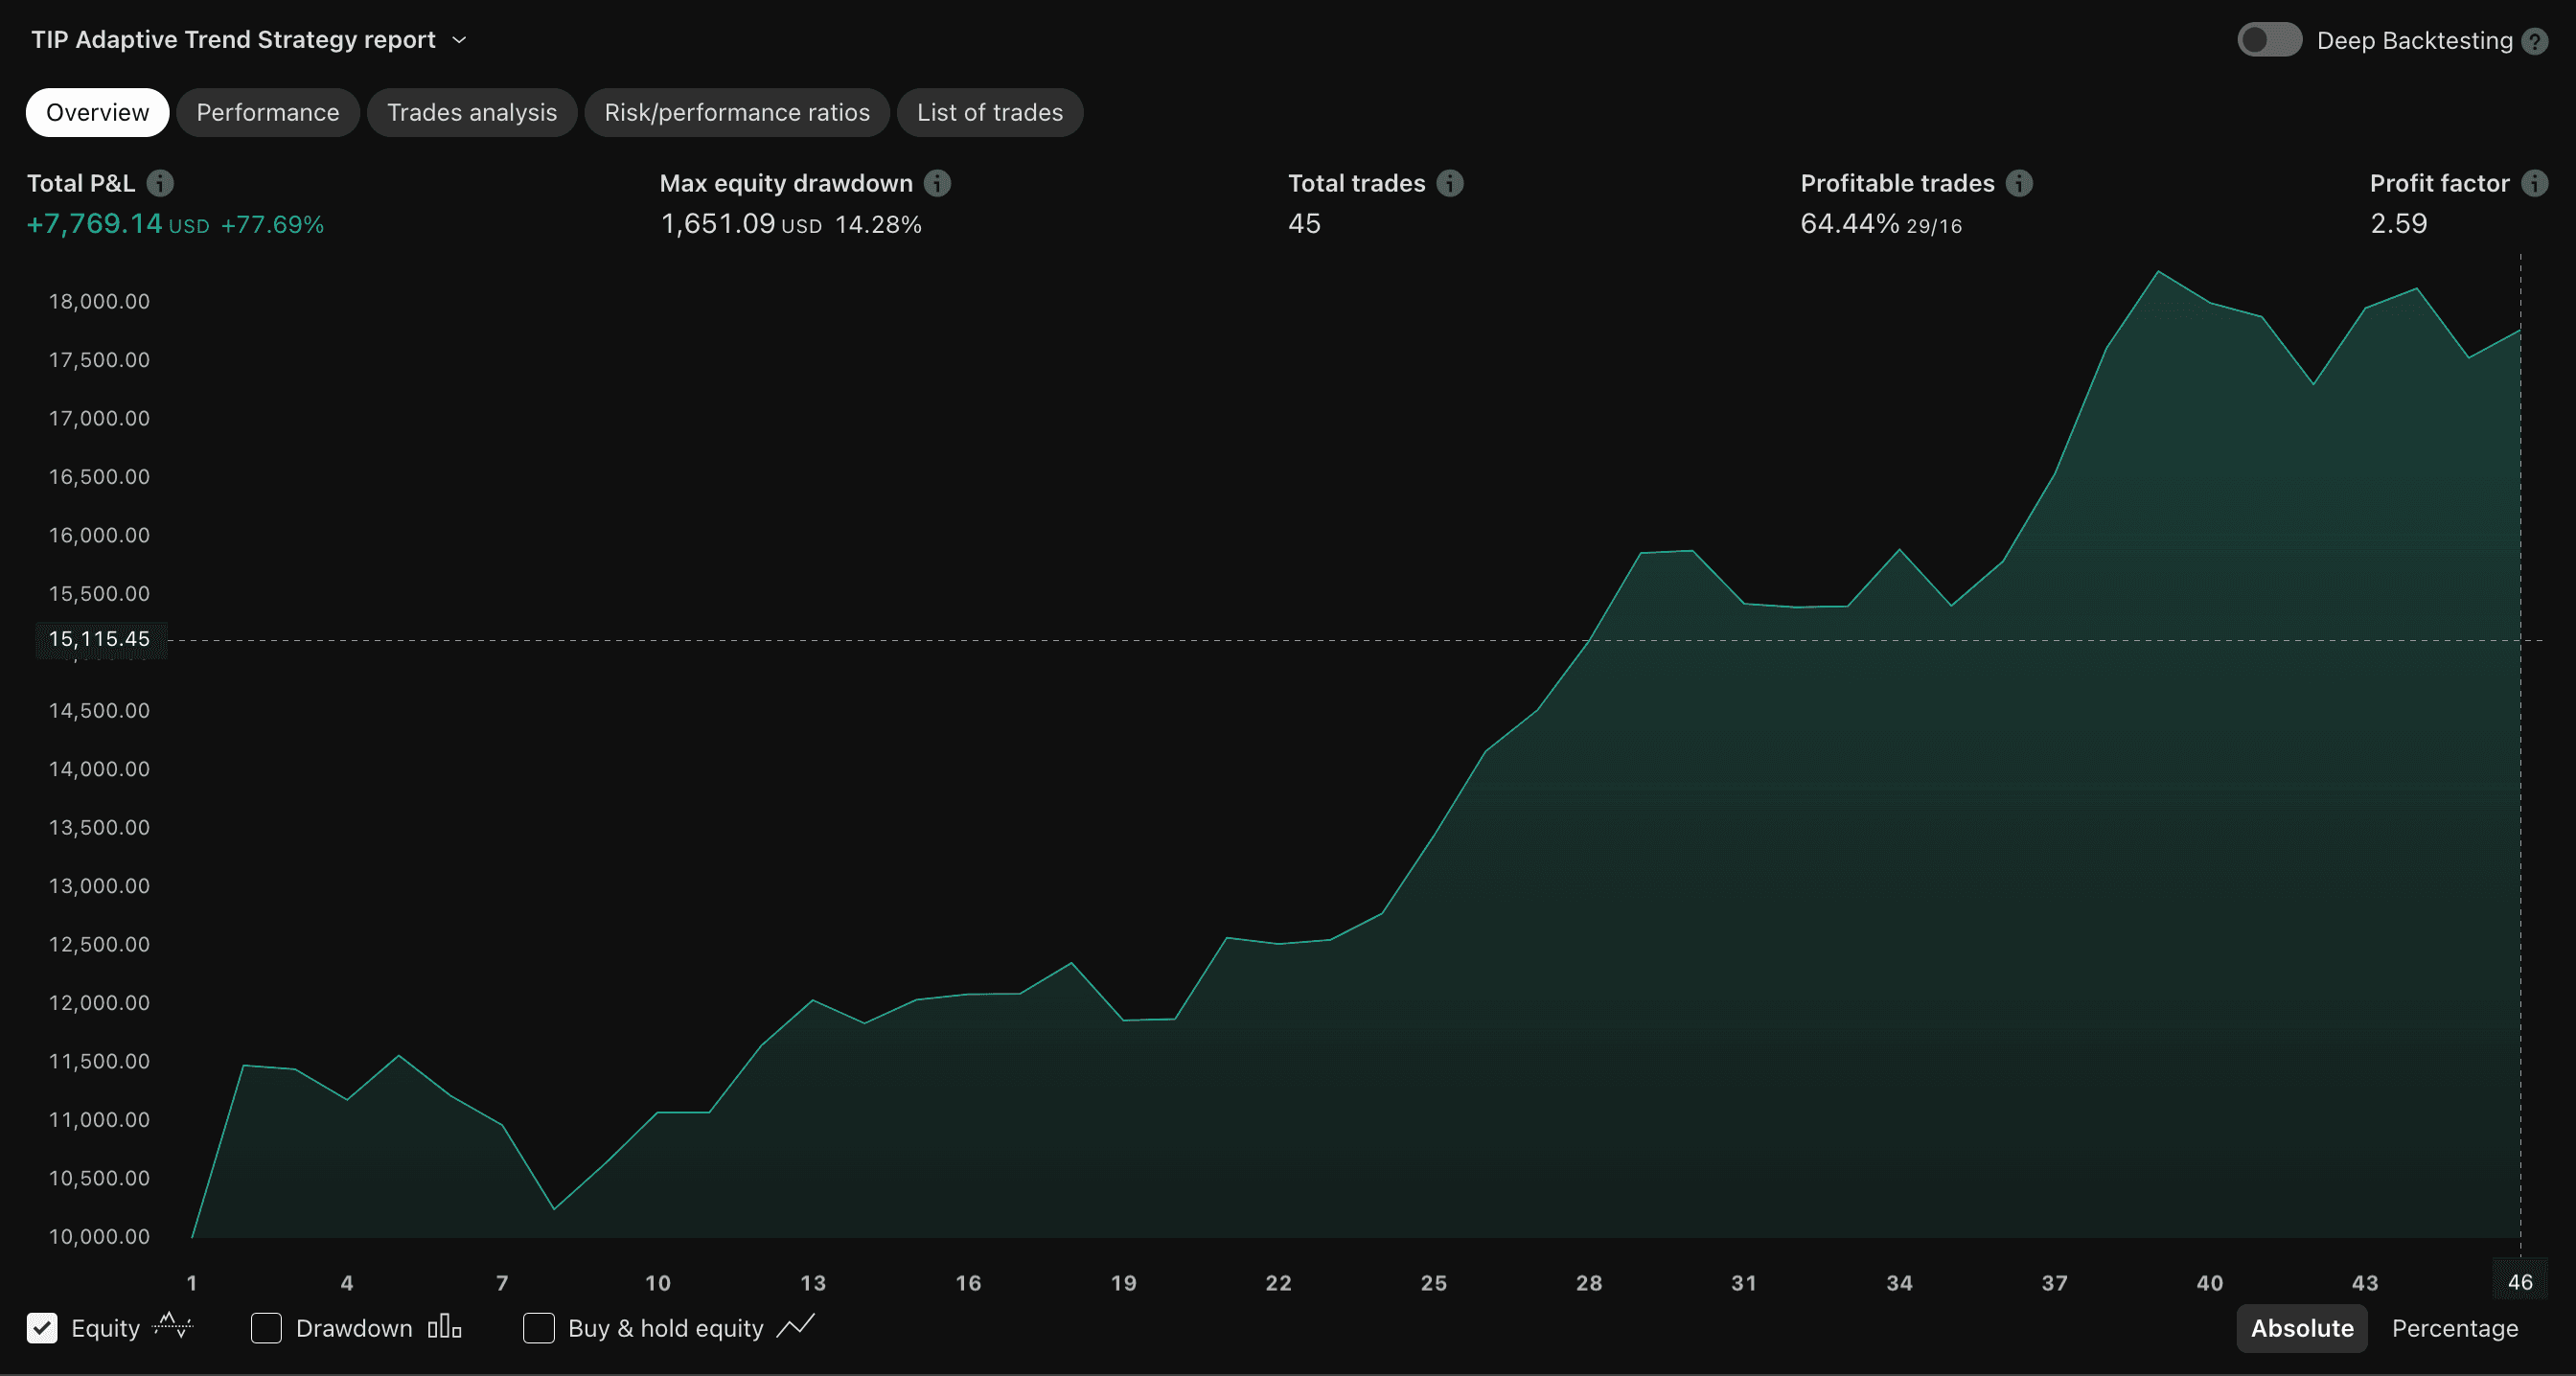
- Backtesting and Optimization
- Use TradingView's strategy tester (Pine Editor > Strategy Tester)
- Analyze performance metrics:
- Net Profit
- Profit Factor
- Maximum Drawdown
- Win Rate
- Adjust parameters to improve strategy performance
Part 2: Configuring Binance API for Automated Trading
Securely connecting Binance to your trading strategy requires careful API setup.
- Generate Binance API Keys
- Log into Binance account
- Navigate to Account > API Management
- Click "Create API Key"
- Set permissions:
- Enable "Enable Trading"
- Disable withdrawal permissions
- Whitelist your IP address for additional security
- Save API Key and Secret (store securely)
- API Security Best Practices
- Use a dedicated API key for automation
- Never share your API Secret
- Regularly rotate API keys
- Monitor API activity for suspicious transactions
Part 3: Make.com Automation Workflow
Make.com will serve as the bridge between your TradingView strategy and Binance execution.
- Create Automation Scenario
- Open Make.com dashboard
- Click "Create a new scenario"
- Add modules in this order:
- Webhook (trigger)
- Binance (trade execution)
- Logging module
- Error handler
- Webhook Configuration
- Add HTTP Webhook module
- Generate unique webhook URL
- Configure expected payload structure
{
    "symbol": "BTCUSDT",
    "side": "BUY",
    "quantity": 0.001,
    "type": "MARKET"
}
- Binance Trade Execution Module
- Connect Binance API credentials
- Map webhook payload to Binance trade parameters
- Add conditional logic for trade validation
- Logging and Monitoring
- Create logs for each trade execution
- Set up email/slack notifications for trades
- Track performance metrics automatically
Advanced Considerations and Risk Management
Automated trading is not a "set and forget" strategy. Continuous monitoring and adaptation are crucial.
Risk Mitigation Strategies
- Position Sizing
Never risk more than 1-2% of your total trading capital on a single trade. This prevents catastrophic losses during unexpected market movements.
- Stop Loss Implementation
Integrate automatic stop-loss orders to limit potential downside. In our example strategy, you could add a stop-loss percentage as an input parameter.
- Regular Strategy Review
Market conditions change rapidly. Schedule monthly reviews of your strategy's performance and be prepared to modify or suspend automation when needed.
Common Pitfalls to Avoid
- Over-optimization of trading strategies
- Ignoring transaction costs and fees
- Neglecting ongoing monitoring
- Using untested strategies with real capital
Conclusion: Your Automation Journey
Automated trading is a skill that develops over time. Start small, learn continuously, and always prioritize risk management over potential gains.
Disclaimer
Cryptocurrency trading involves significant financial risk. This guide is for educational purposes only. Always conduct thorough research, start with small amounts, and consider consulting a financial advisor before making investment decisions.